An Overview Of The HiSeq X Optical System
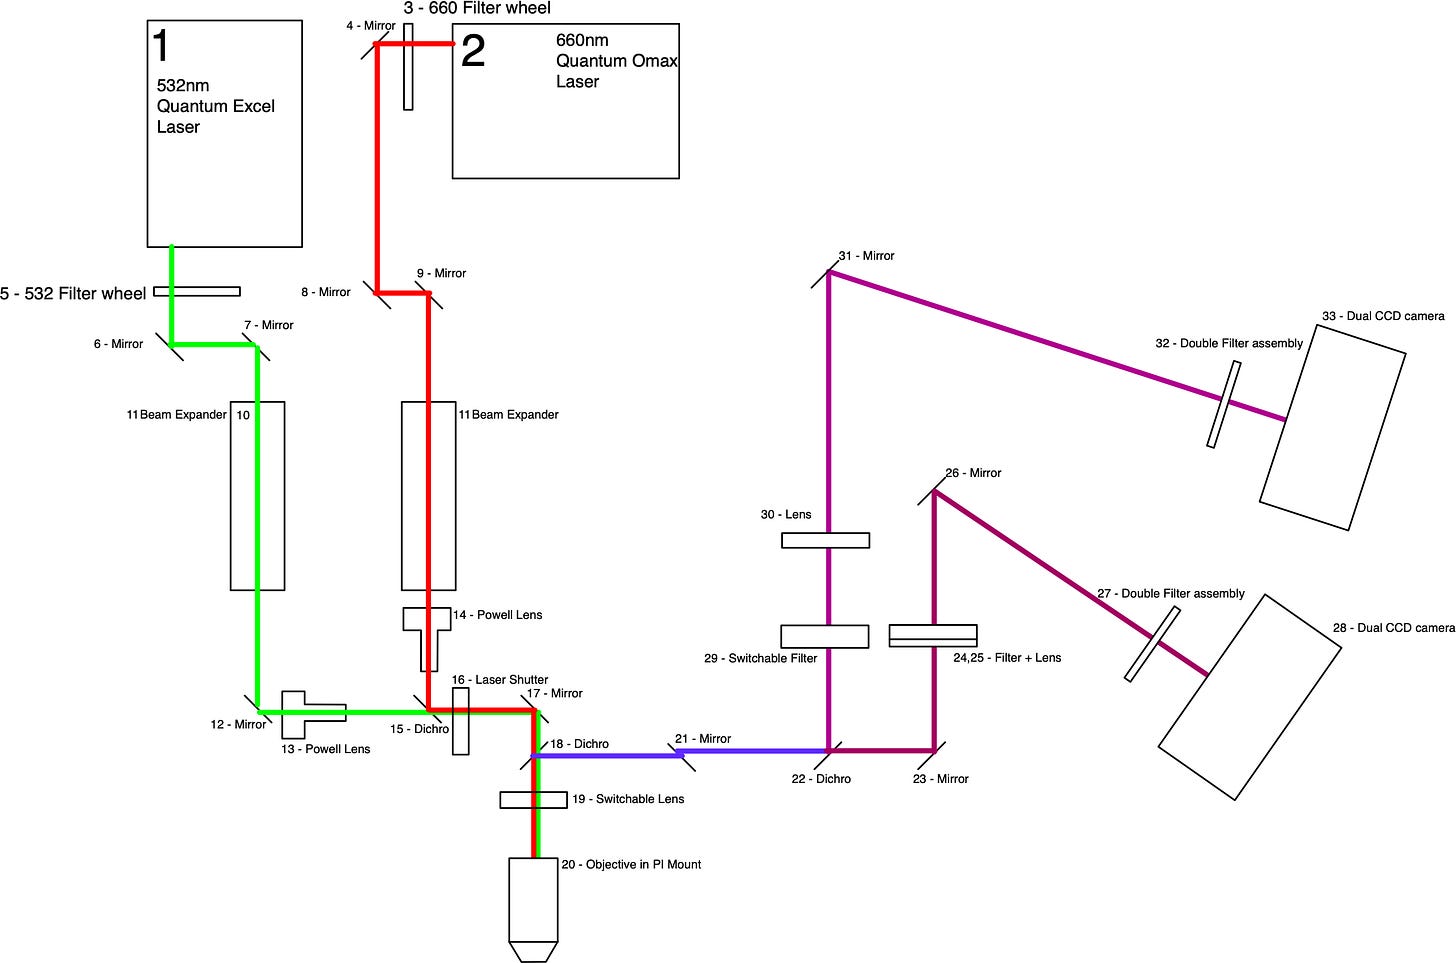
One of my lovely paid subscribers requested a few more pictures of the HiSeq X optical system. Paid subscribers always get special treatment, so I decided to spend today documenting the optics. The above image gives an overview. But let’s try and figure out what’s going on…
We’ve previously discussed the cameras and basic approach used. But briefly the HiSeq uses TDI imaging. That is it scans across the surface building up an image a line at a time.
The HiSeq, being a “4 color” DNA sequencer reads out 4 different emission colors. This is a big part of what complicates the imaging system in the diagram above.
We can make things easier by looking at a single laser/detector and removing the mirrors which just move the beam around anyway:
The laser heads out to a filter wheel, my guess is these are ND filters used to moderate the laser power1. The laser itself can be controlled in software but perhaps there’s a danger of throwing too much power through the system and damaging the sample and cameras. ND filters reduce the amount of light passing though and by slowing reducing the filtering they may be protecting against this.
It could also be that they need less power than the laser can reliably provide in some situations. An ND filter gives them the ability to run the laser at its stable output power but then filter down to a lower power optically.
The beam then heads on to a beam expander and Powell lens. Powell lenses structure an incoming beam into a line (like a barcode scanner):
We want a line rather than a round beam because we only want to illuminate the small strip of the surface we are imaging. The excitation/emission “line” should match up with the sensors on the imager we saw previously:
From there we head into a laser shutter. This is another safety feature as I understand it, and will protect the sample and detection optics if the laser power is too high.
From here we head to a Dichroic mirror/filter. This will selectively reflect light. It will reflect light of the lasers wavelength down toward the objective lens. The light will be focused on the surface and fluorophores (on nucleotides) will light up. This emission will head back up through the objective being of a different wavelength it will pass through the Dichroic this second time round.
From here there are a couple of sets of filters and a tube lens. The HiSeq uses an infinity objective and you need a tube lens here to focus the image on the camera. The filters remove any stray excitation light/emissions. The hopefully clean excitation image will then be projected on to the TDI sensor.
Each camera block contains two TDI sensors, two emission wavelengths head to each block, slightly offset from each other. There are filters directly in front of the cameras to reject one of the wavelengths. That process is described here.
So there it is! A quick high level overview of the HiSeq X optical system.
All the lovely optical bits and pieces are shown in the image below. A full resolution copy is available after the paywall break below along with a list of part numbers.
Subscribe for more posts on the HiSeq X in the future! I’ve still more to post on the stages and a few more thoughts on the fluidics.


